Sunday, August 30, 2009

Resist with MicroGlaze and Glimmer Mist

I thought I'd share with you this cool resist technique you can do with MicroGlaze and Glimmer Mist. It's a simple process with cool results.


1) Lay your screen or stencil down on your paper. Lightly spritz over it with the Glimmer Mist, covering the entire area of the paper.


You can use multiple colors if you wish.


2) Lift off your screen (or stencil) and use your heat tool to dry the paper completely.


3) Lay the screen (or stencil) back down in the stamp position over the image and hold with one hand; with your other hand, dip your brush into the MicroGlaze and brush from the center outward to the edges of the paper, until the entire area of the paper is covered.


4) Lift your screen (or stencil) off and spritz over the entire project with a contrasting color of Glimmer Mist.


5) Wipe away excess color with a paper towel.


Taaaaa da!

(You can use plastic stencils or brass stencils for this technique.)

Hope you get a chance to give it a try!


Tuesday, August 11, 2009

China town album

I have been wanting to get these photos from my trip to Chinatown into some sort of album for quite some time now... and I finally did it! So I thought I'd share it with you.

I decided to use these chip tiles from Tattered Angels to create this album.

I started with six separate boards. I worked on each of them individually, and when they were all completed, I punched holes in each of them and attached them together with fibers.

Each board was sprayed with different colors of Glimmer Mist. After the pages were completely dried, I used gold embossing powder to highlight the edges and raised designs on the chipboard. I also embossed the separate chipboard pieces as I added them to the page design.


I didn't want the chipboard letters to be totally covered with the gold embossing powder, so I was careful just to go over random areas on each letter with my embossing pad.


I embossed the edges of each page by just scraping my embossing pad along the page's edge, then adding my embossing powder, and heating with my heat tool.

You can see that the chipboard pieces come already "dry embossed" with words and designs, so it's easy to just drag your embossing pad or ink pad over the high spots on the tiles to highlight the designs even more.


To create the design on the right side of this page, I used a screen. After the page was dry, I used my fine tip black marker and traced around the edges of the design.


The design on the left side of the page below is also created with a screen. The right side is the embossed design on the tile. I added a tag to hang in the middle of the pages for the journaling.

The design on the tag is a stamp.


Below is the backside of the same tag.


Here you can really see the effect you get when rubbing an inkpad over the high spots on the dry embossed tile. Just lightly rubbing an inkpad over the design brings out the design and makes it really stand out beautifully.

On the right hand page below, I used an embossed chipboard piece. After spraying it with red Glimmer Mist and letting it dry, I ran a black inkpad over it to make the design really predominate. The red background of the pages was done .. again.. using a screen.

Here you can see it a bit closer.


This is the back cover of my book. I love these rich colors! I had so much fun creating this album; and I'm thrilled that I've finally done something with the photos from this fun trip. This book is now sitting on the table in my living room so I can share it with my family and friends. So much more fun then those photos that were just sitting in a box, right?


I hope you feel inspired to pull out some photos you love and create something you can share.


*******************************************
I have to share this photo from CHA. It was so great to get to see Cyndi and Clara and chat with them a bit! The photo below, left to right - me, Clara, Cyndi, and Sandy Redburn (owner of Crafty Secrets Heartwarming Vintage)
Dinner.. next year girls!


Have a great day everyone!~


Thursday, May 21, 2009

Tracing Nature

I've seen all kinds of beautiful simple silhouette canvases lately; they have me totally intrigued. I'm totally drawn to the dramatic contrast of the silhouette image on a white canvas. I've been thinking about how to make one of my own for some time now.. so today was the day!

Here's what I ended up with, but of course the sky is the limit. There are SO many different things you could use for this. I have plans to do a variation of this with pussy willows and another with apple blossom branches.

I can't wait to also try three long interacting canvases, hung together.


** You can click on the photos to see a larger view**


All you need is a canvas (I used a 16x20.), a light or lamp to cast a shadow, and a branch, flower, etc., you want to use for your piece. Be sure to attach your branch to something stable so that your shadow does not move.

Once your shadow is cast and in the position you like, trace around the edges of the shadows (every little place). It really didn't take that long and was actually really relaxing. I found that just lying on the floor with it worked well.

(below)


Once it was all traced, I went over all the pencil lines with a brown Sharpie. Be sure to use a good eraser and remove all the pencil lines that you might be able to see once you have gone over it all with the Sharpie.

(below)


Instead of using water color, I used Glimmer Mist to fill in my image. I just poured some out of the bottle and into a little dish. I then applied it with a paintbrush. (Because Glimmer Mist has metallic in the paint (for that pretty shimmer), if you use it to paint with, be sure to swish it around a bit to keep it mixed up as you load your brush.)
(below)

As I brushed the Glimmer Mist on, I let it "pool" in some places for a more variegated look.
(below)

You can see in the photo below the shimmer that Glimmer Mist has in it.


I bought this green chair at a flea market over the weekend and really needed something with a little more green in it to make it work in this room.

.

A canvas like this is a fun and inexpensive way to add new little bit of Art to your wall.

Hope you get a chance to give it a try!

-Vicki


Thursday, March 12, 2009

Background technique using Lumieres

Hi everyone! Thanks for coming by! Hope you enjoy this tutorial.


I'm going to show you how I made the background color/pattern on this canvas.


First thing you need to do is pick out the colors of Lumieres you would like to use. Once you have your colors picked out, you'll need a piece of mesh, a canvas, and a foam brush or two, to get started.

I have alot of colors of Lumieres out in this photo, but actually I ended up using only two (and some olive green Glimmer Mist).

Lay the mesh down over the canvas and using your foam brushes, start randomly dabbing on some color (alternating colors). The mesh will move; it's not going to leave a perfect "grid" look, but you will definitely see patterns. In some places, the color will be in larger patches; that's okay too.


I liked the look of the blotching here and there with the random grid mixed in, but I also did take my foam brush (without adding more color to it) back and forth across the canvas, in a cross hatch pattern.

You can just play with this to get the effect you like.


I then took my "olive green" Glimmer Mist and spritzed it over the entire canvas. I only let it stand about a minute and then used a paper towel to whip it away, leaving a slight overall green. It did a great job of filling in any of the white that was still showing through after the Lumiere/mesh technique. Both of these mediums take to canvas SO well!


You can see below how the green is subtle. I just wish I could capture the "shimmer" better in these photos. Between the Lumieres and the Glimmer Mist, the shimmer is really beautiful.


So much "shimmer;" it's hard for me to get a good photo of it to show you. LOL


You could use all kinds of things to get different patterns. (If you don't have any mesh around, you can use one of those plastic net bags that onions come in.) The Lumieres probably won't go through burlap, but you could brush it on the burlap, turn it over on the canvas and brayer over it. What about wadding up some saran wrap, wax paper or just regular paper, and dabbing the Lumieres onto your canvas that way; or just dry brushing it on? The possibilities are endless.


Here are a few close-ups of the finished canvas.


Anyway you do it, it's a fun and different way to use your Lumieres and make a gorgeous background for a canvas, right? Hope you give it a whirl!

Thanks again for coming by!
-Vicki

Thursday, February 5, 2009

Salt and Glimmer Mist Tutorial

Well, I'm pretty excited because this is my first post on my Altered Arts Magazine blog. I have always loved learning techniques and trying new things... so being a part of this talented group of artists is something I'm really looking forward to.

The technique I'm about to share with you is one I've done many times, using different water based inks and dyes. For some time now, I've been wanting to give this technique a try using Glimmer Mist. Well, today is the day.
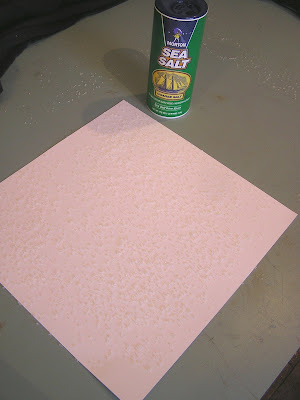
 LOL

To get started .. here is what you'll need.

Rock Salt or Sea Salt: You will get a more defined pattern the larger the salt pieces. I normally use Rock Salt, but this time I used Sea Salt. It has a more subtle effect, but beautiful nonetheless.
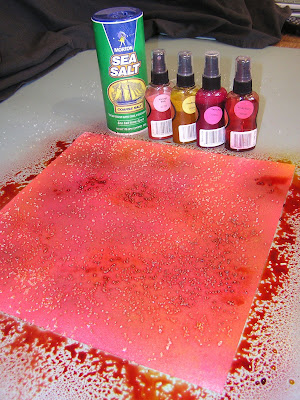
White cardstock

Glimmer Mist (your choice of colors)

_______________________________________

Very Simple. Just sprinkle the entire area of your paper with the salt.

Choose the color(s) you would like to use. Spray the entire area of the paper with Glimmer Mist. (You can also use Walnut ink, Poss Impressions, Color Washes, Watercolors, etc.)

Saturate the paper. (It works best if you get it very wet.)

Then, either walk away and let it dry... or if you're a bit impatient like I am and want to speed up the process, use your heat gun!


Once you're sure the paper is totally dry, brush away the salt to reveal the beautiful patterns.

Note: It is very important to make sure your paper is completely dry before removing the salt, in order to get the best results.

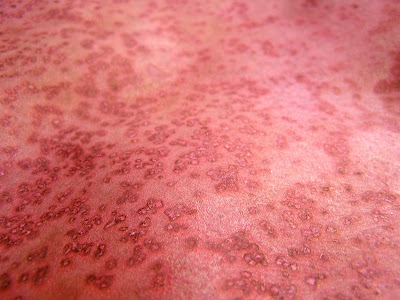
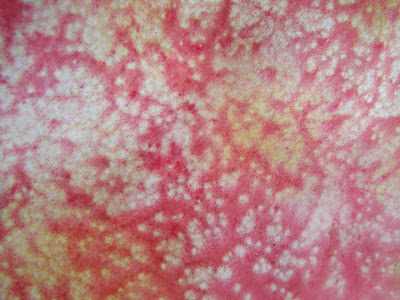
Here's the fun part. Be sure to check both sides of your paper, because sometimes I can't decide which I like better. The photo above is the top of the paper. The photo below is the bottom of the paper when turned over. I really like the look of them both... so.......


I used them both on my project. LOL


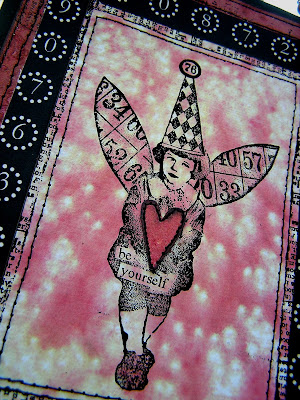
I used the lighter, backside of the paper for the part I stamped on for the center. I used the darker, top side for the base of my project.


I hope you are inspired to give this a try for yourself. It's a super fun and easy technique!